This year I decided to take my lessons and place them in centers by art medium. WOW, have I learned a lot!
First, know your Artists! I have worked with this group for 2 going on 3 years and decided, yes my Artists need more choice. Last summer, I spent a lot of time brainstorming and gathering bits of information from TAB to modified to 'woooo' look at what that art teacher just did!!! Have you seen my Pinterest board, it's crazy!
In my 8 years of teaching, I have customized my ever-evolving lessons with state & local art standards, new products & techniques and all-in-while providing students with a choice. At least I thought I was.....It all started when I stepped back and looked at the 140+ pieces of a grade level art project and then I looked at the overall 700+ pieces of artwork hanging up in the school....and a list started forming of what choices do I actually provide... Without going into a looonnnggg typed conversation, I was ready to start providing more choice.
During summer camp, I did a little test run. I had 6 tables, with different techniques at each and simple steps that gave the students free-range of what he/she wanted to make. The short of it, artists worked too quickly, messes were left and a lot was thrown away.
In Aug. 2015, I knew my Artists needed a direction and a finished vs not finished example. I introduced 3 lessons in one day. Yes, short, sweet and to the point. K-5 all listened to art history, watched a demo, and then sketched their idea in a sketchbook in 45 minutes. I mentioned more to 4th and 5th, if they had a different idea on what they wanted to create, then they may sketch that idea.
Prepping materials for the first 3 projects was easy drawing, collage and winter scene. Each grade level had a box with project size paper and any extra handouts or special materials. For example the collage table already had paper, glue and scissors ready to go when the next class walked in. I trained table helpers to pick up their colored table folder, pass out sketchbooks and look at the binder Art Studio Steps.
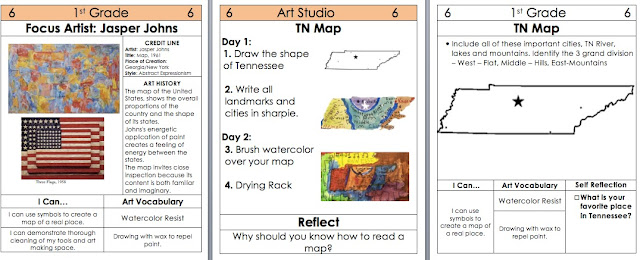
Below, is my sort-of started examples for each lesson. This was the 1st week of introducing the art centers. After this I had 18 different lessons a day but really 6 lessons per 3 art materials for 6 weeks. I did this first with drawing, collage and winter scene, and then, watercolors, weaving and clay. (Side note: I will have an all clay week next year because of field trips, holidays, etc. reasons.)
Next, we started to create. The first week of art centers was A LOT OF REPEATING MYSELF, but after we got past that, I could see how some artists were following my example, some were taking their time and choosing to do something different (but they were still making a winter scene, or a collage, or a still life etc.), and then there were some, "Mrs. J, I'm finished now what?" They wrote an artists statement (see TPT) glued to back of artwork and I began teaching them how to upload their work to artsonia! Some artists I had them create another..same materials different subject matter.

I even came up with a way to change out artwork SUPER QUICK, mounted paper with 2 paper clips. (yes, most times I had to place a small amount of tacky-putty near the bottom of the picture). When I looked at the artwork now, I began to see variety and hardly any looked like my teacher example. Next year, I will mount a colored paper to the artwork before hanging it. I also loved that the students name was always visible, and so did parents/visitors. I need to re-vamp the teacher's name cards next year, give it a little more POP! I could have an artshow at any time. Every class has artwork hanging up all year long.

With each class creating a collage or a painting, I had to come up with a way to remind myself which artwork belong to which grade level. So.....I colored coded my drying rack. I found board at lowes, the guy cut 5 sheets of 4x8 feet into 24"x24". I'm placing a colored laminated paper on each board with the grade level on labeled. This to took some training, but even when coming back in on a Monday, I have no trouble remembering which teacher's bucket the artwork goes in, even if it's missing a name.
As the new semester begins, I will be introducing 6 new lessons over 2 class sessions. I have placed labels above my tables, made teacher examples that show Day 1 vs Day 2, created an upload station, made free art stations for early finishers (basically ATCs) and re-organized and labeled available materials. Pictures will soon follow.