What I am about to share works for me and my students. I think it's important for each art educator to review their local, state, and national standards. Also to create lessons that work for you as well as your young artist!
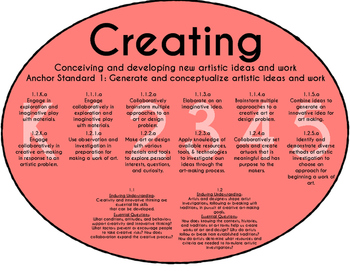
Over the next few post, I will be presenting how I kept the foundation of DBAE and introduced TAB/Choice within my K-5 setting.
Then to Now...
In this first post, I want to show how my classroom has changed over the years.
In 2007, I started in middle school. Wasn't for me but there I learned to start gearing lessons toward students.
In 2008, I was moved to an Elementary school.
I had a place to gather on the foam carpet, I posted daily inspirational quotes and was happy to realize I was made for teaching art to younger students. It still was difficult. I had to deal with behavior issues and classroom management. The students made it tough but I had an awesome administrator. We had wonderful follow a long lessons and made some fun stuff. Here is where I knew I wanted to incorporate all the different art making mediums.

In 2009-2012, I was displaced to another Elementary school.
Oh, behavior. I don't want to dwell but it was just WOW. ...Talk about how that shapes an individual and your view points on teaching. I had to be firm and hold my own ground. Let's just say, it was a lot of energy. Here is where I started having the idea of adding different spaces in the room for early finishers, reflective time or quiet time.

Between 2011-2013, I was split for one year between two schools and then worked full time the last year at that school. This is where I started playing with the idea of introducing centers to early finishers. I like this idea for materials that I didn't have a lot of and could limit the number of students per bucket. But I was still wanting more.

In 2013, I started where I currently am now and WOW was there a lot of stuff:
- Take the time to organize the room, you will be so happy


It took me four years but the room is starting to take shape. The first year, at my fifth school, we did follow along lessons. I needed to figure out what everyone knew. As we worked together, the artwork looked great but students weren't being challenged to think independently and all the artwork looked the same to me when I would hang up an entire grade level. I didn't have behavior problems and the students were more interested in the small shoe box choice centers that I had brought from the pervious school.

In 2013 and 2014, I took this time to find lessons that were more challenging and that provided a well balanced art experienced from K thru 5th. I knew I wanted to focus on the mediums. So I went for it! I picked lessons that could be completed in 2 class sessions, had a focus artist/style, made a connection to the standards that went with my district and introduced a new technique each grade level. .
In the summer of 2015, I had this idea of just trying centers with the summer camp. I asked my Principal for permission to start transitioning the art room into centers and I wanted to experiment with the summer camp. The 6 tables had 6 mini lessons based on painting. Ha, it was a lot of excitement for them! I had mono-printing, texture paste, color mixing , action painting, marbling and just free-paint. On Monday, I introduced the 6 mini lessons based on an artist/style and then demonstrated the techniques all within the hour. On Tuesday, I said make art. I gave no instruction but to clean up if you make a messy. Each table had basic steps: Step 1: sign your name Step 2: Apply texture paste Step 3: Paint in the paste Step 4: Clean up. I wanted to see what students would do. It was messy to say the least. On Tuesday - Wednesday- Thursday students completed 2 centers a day. ON Friday, I passed back all the work, we made a portfolio and added pastel/markers to finish the artwork if needed.

The take away: Students need to understand what are art centers.. What is the purpose/Objective, Guidelines/Expectations and most of all how to take care of the materials and what ways they can use them....
While, I like the idea of a student center based art room, we needed to start with good foundation. I worked toward developing my lessons to streamline into two day art centers.
Fall of 2015:
In August: With the tables still separated, the very first two classes, all grades completed a different follow a long lesson with me to make art for the hallways! I introduced this project using the new lesson outline, thumbnail sketching and went though the process with the students.

After that project, I started with 2 centers: Painting & Drawing/Collage

This was for grades 2nd, 3rd, 4th and 5th on a 5 day rotation. One side of the room was drawing/collage and the other painting. Each grade level was using the same/similar materials but learning new techniques/artist focus/style with in their lesson.
Demo Day: I would introduce the students to the two projects that could be completed within one class& in the blue bins were basic materials they could also choose to use. I have 45 minute classes - I took 20 minutes for each to introduced the style/history/artist, demo a bit and then students would sketch. While sketching, I gave them a choice of following the example or how could they still complete the objective by choosing a different subject matter or art making approach. Most followed the example. On this week of just demonstrations: Monday, I prepped for 2nd grades two centers, Tuesday 3rd...Wednesday 4th and Thursday 5th grades centers during my planning.
Class Day 1: Each class had about 25-30 students so I picked which side the students would sit on to start by placing down their sketchbooks which I placed on top of a table folder. On one side was their sketchbook was for Center 1 and the other side of the paper was their sketch for Center 2. Students entered the room, found their sketches and re-read their center directions which were on the big screen.
Class Day 2: The students entered the room, I had already placed their sketches on the other side of the room for them to switch sides to start the other lesson. They re-read the center steps and began.
Class Day 3: Catch up day for absent students would work the full time at the center they missed. Other students would add to their artwork maker/pastel and then we would share on the carpet.
In the October , I thought hey let's try 3 centers for 2 days each. Clay, Drawing/painting, Weaving

I even started with Kinder and 1st and grouped the tables into 3. The tables facing each other have the same grade level lesson for the students to review. Between classes, I flip the notebook to the next grade level lesson.
Outline:
Demo Day: 15 minutes for each project - Artist Focus - Demo and Sketch for each of the 3 projects. This was difficult but we focused on those I can statements/standards - what was relevant to know about the artist and new skill/technique. When we sketched for 5 minutes, I would ask them how they could they envision or make a personal connection/story with this artwork to make it more meaningful to them.
I made them sketchbooks for these 3 projects:

Day 1 & 2: Start at Center 1 - I placed sketchbooks on the table. Students entered found their sketchbook, reviewed the center steps, placed materials on the table and began.
Day 3: Share day/catch up/artist statement focus
Day 4 & 5: Rotate to Center 2 - I had already placed sketchbooks on the table, students enter, reviewed the center and began.
Day 6: Share day/catch up/how to upload artwork to artsonia focus
Day 7 & 8: Rotate to Center 3 - I had already placed sketchbooks on the table, students enter, reviewed the center and began.
Day 9: Share day/catch up/ artist statement/ upload to artsonia.
I observed a change in students art making. Some would finish on Day 1 and then on Day 2 we would discuss how they could elaborate, add more detail, or challenge themselves by starting another based on their own ideas. Sometimes the finished students would go to the carpet and try a mini center : origami/pattern blocks/legos/dry erase board with drawing book... Some students would work the 2 full classes to complete the project and express how nice it was to work at their own pace. I started to notice how the artwork looked different and students were taking more ownership.

By January of 2016 I was planning for maternity leave that March. My pervious interim in 2011 did not follow any of my outline lessons that went with the districts standards. He chose to do a lot of hand stamping that turned into animals. I was not going to let that happen again. I designed 6 centers for all grades with 4/5 students per center and students would spend 2 classes per each and then after their 3rd center rotation... they would have a catch up day/upload to artsonia. Drawing, Pastels, Sculpture, Painting, Watercolor and Printmaking.
Well, it worked and my interim did very well. I kept the room in the same layout.
Demo Day 1: 3 lessons, sketches
Demo Day 2: 3 lessons, sketches
Class 1&2: Table 1
Class 2&3: Table 2
Class 4: Catch up Day/upload
Class 5&6: Table 3
Class 7 & 8: Table 4
Class 9: Catch up Day/upload
Class 10& 11: Table 5
Class 12& 13: Table 6
Class 14: Catch up Day/upload

Fall of 2016:
The first two classes, we made a project for the hallways. Class 3, I introduced 3 centers. Drawing, Weaving and Painting. By December, everyone was finished with the 3 centers and we all completed a winter project together.
January of 2017: I think I had CLAY week where everyone completed a clay project. Madness, I know. Onto 6 centers: Demo Day 1: Intro to 3 centers and Demo Day 2: intro to the other 3 projects. We finished out the year with make and take projects. 6 Centers: Collage, Printmaking, Painting, Drawing, iPads, Sculpture
Fall of 2017:


8 centers for grades 2nd, 3rd, 4th and 5th.
Class 1: Demo Day: Centers 1,2,3 - Drawing, Collage & Fibers
Class 2: Demo Day: Centers 4,5,6 - Sculpture, Painting, iPad
Class 3: Start Center Rotation 1
Class 4: Continue at Rotation 1
Class 5: Continue at Rotation 1 - artist Statement, share, upload to artsonia
Class 6: Demo Day for Centers 7 & 8 - Printmaking & Clay (students practiced with modeling clay)
Class 7 : Start Center Rotation 2
...etc.
The goal was to complete 4 rotations by December and have 4 for the Spring...oh we are pushing it. If students have now completed the project on Day 2, I'll let them upload and write and artist statement and move to a center the next class.
1st Graders continued with three centers for the first, second and third 9 weeks because the tables are still grouped together. Kindergarten started 3 centers in the second 9 weeks. The 4th 9 weeks, I have to play by ear. I may only see students 4 or 5 more times.
If you have read this far...I hope all of this made some sense & Thank you for reading! It does look like a lot of work and it was in the beginning but I have fun everyday I go to work.
My plan for Fall 2018 centers:
-More menus of choice for each grade for each center
-Focus on implementing my new district standards that tie to the National standards with each center demonstration.
-Provide more flexibility to move between centers and to develop their own projects
-Encourage more mix media pieces
-Probably Clay week again for 1st and Kinder
In the next post, I plan on sharing how I set up materials and what projects I do with each grade level & how students have choices.
Here's my artsonia page: https://www.artsonia.com/schools/school.asp?id=2438
~ please note...all students 2nd thru 5th take their own picture for artsonia :-)


