Sunday, September 4, 2016

Sunday, July 31, 2016
Be Kind!


When I begin a new year, I always want to hang artwork the first week of school so I came up with a quick project that will spread JOY and COLOR! I'll have 31 classes create what they want to "BE" for the year. Artists will write a single word big and bold!
Step 1: Write your name at the bottom and your word LARGE with Sharpie.
Step 2: Begin painting designs around your word with warm or cool colors plus white.
Step 3: Trace over your word with BLACK paint and add a border.
Step 4: Drying Rack!


Wednesday, June 1, 2016
New Sub Plans

This is an editable 108 page word document. .docx
This will help any art teacher organize their substitute folder.
108 pages includes:
Intro letter
School info - Snap shot schedule, contacts and where to find
Emergency procedures
Daily schedule
Calendar
Reflection Sheet for Sub
Classroom Management
7 Sets of Class Rosters Templates 6 pages each in Rainbow colors
Simon Says Lesson with 4 examples
Pass the Drawing Group activity
Art Doodle with Handout
Individual Grade level lessons plans for K-12 using dry art media
****K-8th Lessons have Step by Step handouts that the Sub can pass out copies
K - Color Garden
1st - Fish Bowl
2nd - Abstract Mystery Portrait
3rd - Create a Creature
4th - Lego Portrait
5th - Dot and Dash/Pointillism
6th - Patterned Name Design
7th - Sweet Treats
8th - Op Art Sphere
9th - Shattered Color Wheel
10th - Radial Design
11th - Figure in Motion
12th - Magazine Expanded Drawing
Feel free to edit lessons for different grade levels!
Tuesday, April 5, 2016
K-5 Artsonia Uploading by the Artists!
Artsonia Uploading by the Artists while I am on maternity leave!!!!
It can be done, just remember that! First, I introduced the whole class how to upload. Then when a whole table was ready to upload, I would invite them to the upload station. Next, came uploading. I had my Dad build the iPad stands with a slot for a clipboard. All work is hung vertical and then rotated in the App. The first week...was a lot and I mean a lot of repeating...Yes, I wrote out steps, but honestly....it was quicker to visually show them when they were actually doing it.
After the students rotated to another art center, they were responsible for teaching/reminding each other how to upload. For sculptures, I found a box and taped a white background to it. I'm hoping next year I can come up with something better. All in all, Kinder thru Fifth have been sending me work for a month and its been great!


Saturday, February 27, 2016
39 Weeks Pregnant & Artwork is Up
This was my last full week of classes before I start focusing on having my little girl. My awesome husband helped me power through hanging the butcher paper while my 4 year old son played in the art room :-).


The school will be celebrating its 25th anniversary so the walls needed to be colorful before I left. My interim may have to fill in a few spots because I couldn't hang wood sculptures but I'm glad I was able to finish the majority.
Two weekends ago the paper was up. Last weekend, my Atrists finished an art center rotation so I had mounted the art to black paper with a name card or artist statement at the end of the day & put a clip on it. Last Saturday, it took me about five-six hours...you move slower when pregnant & I also had an hour lunch.
I put all the artwork on a cart...because bending down was not an option anymore. A cart with an extension cord and a cordless glue gun makes the process go much faster.
The butcher paper was color coded by grade level and added the pop of color. I like hanging art in rows or staggered so it was a bit 'messy' trying to fit 29 pieces onto a smaller butcher paper...but hey...make it work. I'll have a better plan for next year. For right now 31 classes are up!
...Next year, I'll probably mount the artwork in my room on the butcher paper and then use clips and command hooks to hang it up in the hallways. Since he butcher paper will be on clips, I plan on moving the artwork into the cafeteria during music programs so parents can see their child's artwork. :-)
At 39 week, my last project this week was making a banner for a surprise birthday celebration for the students to add signatures around. I'll miss the celebration but Jahnig is out!
Saturday, February 13, 2016
Art Center Notebook Outline & Kinder Art Centers with Sub Plans
The Art Centers have really been a nice transition this year. I took the lessons I normally teach in a year and introduced multiple lessons at a time. This allows more creativity from the students because they are no longer following a step by step project from me. Yes, they are reading a step by step but it's very open to interpretation. Artists have given me feedback, that they have enjoyed art more this year because they are getting to have more choice. I still have students who choose to follow my example but they are still changing the subject matter.
 I just completed the Kindergarten Art Centers with Sub Plans included on my TPT. This was a lot of work and I'm still in the process of updating 1st - 5th. I will always notify buyers when I have updated the files.
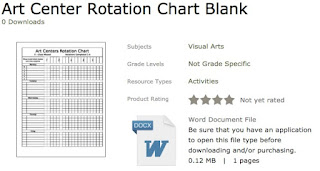
Here is a FREE download of the chart I use to keep up with the Art Center Rotations.
The Art Center Substitute Notebook for K-5 Table Centers has a PREVIEW download highlighted pages that it includes.

I just completed the Kindergarten Art Centers with Sub Plans included on my TPT. This was a lot of work and I'm still in the process of updating 1st - 5th. I will always notify buyers when I have updated the files.Here is a FREE download of the chart I use to keep up with the Art Center Rotations.
The Art Center Substitute Notebook for K-5 Table Centers has a PREVIEW download highlighted pages that it includes.
Wednesday, February 10, 2016
1 Sub Folder for 1 Semester
I will be taking maternity leave in 3 weeks and this notebook holds all information for anyone to walk my Artists through finishing the Art Centers to the month of May.
Here's the TPT for the notebook starter.
I took 2 classes to introduce and demo each grade levels lessons/projects....now it's time for the art making!
First, I had to create 'Custom Tabs'. The tabs were blank, I cut them accordingly and then used color pencils, sharpie, and covered the tabs with tape. Organized! Here's a FREE Blank Chart.

In the idea of working with centers for 12 weeks, I had to keep track of which classes were where. As you know, field trips, snow days....art classes are missed. My only worry now is that there's not enough time for them to rotate. Don't worry, I have a plan B. During the month of May, Artists will be allowed to make 'mini' works of art at the centers. This will cut a 2 day project into 1.
Back to the Art Sub Center Notebook:
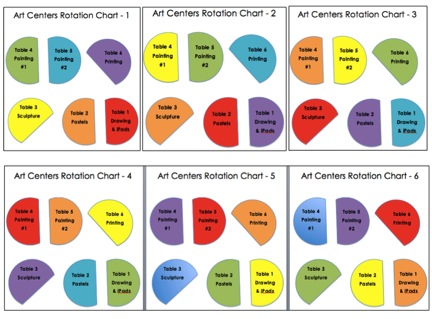
First, I have the daily chart to record which rotation a class is on. Keep in mind, classes on the same day may have different rotations. I have rotation charts located in 3 key places: First, a flip chart outside my door, so Artists can see where their colored table folder is being rotated to before they enter the room.. Second, on the white board...Third in this Sub notebook. Most students understand that they are rotating in order based on the number in which they started at.
I have 6 tables, 6 lessons in 6 mediums... for each class. Each grade level has a box on a shelf located next to the table with the materials they need. I will share a different post on how the shelves and table notebook examples are set up.
I have 6 tables, 6 lessons in 6 mediums... for each class. Each grade level has a box on a shelf located next to the table with the materials they need. I will share a different post on how the shelves and table notebook examples are set up.

Side Note: Artists will make a colored dot mark on the back of their artwork, so when I pull artwork off the drying rack...I can go to their classes bin and know exactly which colored table folder it goes into. My drying rack is also colored coded by grade level.

Next, the Art Center Notebook has a "Welcome, Read Me" and "School Info, Emergency and Management" Tabs. I included a "Daily Morning" to-do sheet of what the Sub should set up and read before classes begin. This should allow the Sub to familiarize themselves with the Art Centers.
The next tabs hold all the lessons for each grade level. Yes, all K - 5 has both a Day 1 and Day 2 schedule lesson plan that does a brief walk through for each table center. (36 different lessons in a day) Yes, it did take a lot of time to put together, but every year, I update lessons and this is a great way to see how lessons/techniques are evolving each year. I'm also considering having the same centers begin in August...they are already set up... and ready to go. At the same time, it's not overwhelming. The lessons are using the same medium/similar at each table. The grade level boxes are already prepped...I had a few more paper here..foam there...to keep materials in stock.

Last 5 Tabs: After the lesson tabs.....come the Monday - Friday class rosters.
This idea of centers with my students has been trying but very rewarding. My first year with them, I would hang my examples and all the art would look the same. Last year, I rarely put up my teacher examples and I recycled my demo examples...but the kids still wanted theirs too look like mine but 'some' started to personalize their subject matter. This year, it's the total opposite. On my board are all 6 examples for each grade level, but the majority of the work doesn't look like mine. Before starting these centers, I told the students that they had a choice of what he/she wanted to create because "They are the Artist". My leading lesson was just an idea of how the Artist can explore the style of art making. I wanted them to explore a new way to make their art more personal and meaningful with a connection to the lesson idea. I still have some give and take days of asking Artists to work on their craftsmanship and how could they explore different ways in using the materials. Most of all, some of my Artists still need a given Subject/Theme/Direction, but others are beginning to challenge themselves and create what they want to. Overview: It's going to take time.....modified lessons to Tab...not sure yet.


Wednesday, January 27, 2016
Huge Group Mural!
Wow! This is by far my favorite out of the 3 murals I have made this year. I think the bigger the better. We've done circles, hearts and now flowers.

Wednesday, January 20, 2016
Group Displays!

My school has 6 display cases, office art and a big square board! I try to have artwork rotate every 3 months, but I'm going on maternity leave at the beginning of March. I wanted the Artists to create something beautiful but also completed in a day. I was ready to introduce art centers and my timeline is pretty tight with making sure Artists understand each center and have rotated at least once before I leave.
In the display cases K created flowers, 1st created caterpillars and another 1st grade class created the backgrounds, 2nd create symmetry butterflies, 3rd origami flowers, 4th origami butterflies and 5th created origami birds. The kids loved it. I would pre-measure the backgrounds to make the process go faster! I was inspired by Cassie Stephens and her awesome murals!

These office pieces were a huge hit! I did have an outline for the TN so the Artists had boundaries! We also created another 64 piece wall mural, picture coming soon, of each Artist creating a 1/4 flower with a warm/cool color scheme.

Saturday, January 2, 2016
2016 Art Room Changes
This year I decided to take my lessons and place them in centers by art medium. WOW, have I learned a lot!

First, know your Artists! I have worked with this group for 2 going on 3 years and decided, yes my Artists need more choice. Last summer, I spent a lot of time brainstorming and gathering bits of information from TAB to modified to 'woooo' look at what that art teacher just did!!! Have you seen my Pinterest board, it's crazy!
In my 8 years of teaching, I have customized my ever-evolving lessons with state & local art standards, new products & techniques and all-in-while providing students with a choice. At least I thought I was.....It all started when I stepped back and looked at the 140+ pieces of a grade level art project and then I looked at the overall 700+ pieces of artwork hanging up in the school....and a list started forming of what choices do I actually provide... Without going into a looonnnggg typed conversation, I was ready to start providing more choice.

During summer camp, I did a little test run. I had 6 tables, with different techniques at each and simple steps that gave the students free-range of what he/she wanted to make. The short of it, artists worked too quickly, messes were left and a lot was thrown away.

In Aug. 2015, I knew my Artists needed a direction and a finished vs not finished example. I introduced 3 lessons in one day. Yes, short, sweet and to the point. K-5 all listened to art history, watched a demo, and then sketched their idea in a sketchbook in 45 minutes. I mentioned more to 4th and 5th, if they had a different idea on what they wanted to create, then they may sketch that idea.

Prepping materials for the first 3 projects was easy drawing, collage and winter scene. Each grade level had a box with project size paper and any extra handouts or special materials. For example the collage table already had paper, glue and scissors ready to go when the next class walked in. I trained table helpers to pick up their colored table folder, pass out sketchbooks and look at the binder Art Studio Steps.

Below, is my sort-of started examples for each lesson. This was the 1st week of introducing the art centers. After this I had 18 different lessons a day but really 6 lessons per 3 art materials for 6 weeks. I did this first with drawing, collage and winter scene, and then, watercolors, weaving and clay. (Side note: I will have an all clay week next year because of field trips, holidays, etc. reasons.)


Next, we started to create. The first week of art centers was A LOT OF REPEATING MYSELF, but after we got past that, I could see how some artists were following my example, some were taking their time and choosing to do something different (but they were still making a winter scene, or a collage, or a still life etc.), and then there were some, "Mrs. J, I'm finished now what?" They wrote an artists statement (see TPT) glued to back of artwork and I began teaching them how to upload their work to artsonia! Some artists I had them create another..same materials different subject matter.

I even came up with a way to change out artwork SUPER QUICK, mounted paper with 2 paper clips. (yes, most times I had to place a small amount of tacky-putty near the bottom of the picture). When I looked at the artwork now, I began to see variety and hardly any looked like my teacher example. Next year, I will mount a colored paper to the artwork before hanging it. I also loved that the students name was always visible, and so did parents/visitors. I need to re-vamp the teacher's name cards next year, give it a little more POP! I could have an artshow at any time. Every class has artwork hanging up all year long.

With each class creating a collage or a painting, I had to come up with a way to remind myself which artwork belong to which grade level. So.....I colored coded my drying rack. I found board at lowes, the guy cut 5 sheets of 4x8 feet into 24"x24". I'm placing a colored laminated paper on each board with the grade level on labeled. This to took some training, but even when coming back in on a Monday, I have no trouble remembering which teacher's bucket the artwork goes in, even if it's missing a name.

As the new semester begins, I will be introducing 6 new lessons over 2 class sessions. I have placed labels above my tables, made teacher examples that show Day 1 vs Day 2, created an upload station, made free art stations for early finishers (basically ATCs) and re-organized and labeled available materials. Pictures will soon follow.
Subscribe to:
Posts (Atom)